How to Arm Knit a Giant Blanket in 3 Hours

Learn how to arm knit a giant blanket with Wool Couture.
Here at Wool Couture we love to plan our kits around how they make us feel – the texture of each stitch, the feel of our soft wool and knowing that the sheep it comes from are well looked after. We hope you feel amazing when you complete our how to arm knit guide.
I love creative therapy and believe that everything surrounding each project should make you feel a sense of serenity – a feeling that you can truly relax and enjoy the experience while at the end relishing in the pride of knowing that you have created it yourself.
In honour of this passion for creative healing, I have a simple, quirky activity for you to do at home that works up quickly
You’ll have a finished blanket in hours rather than weeks, especially if you use our super chunky luxurious Epic Extreme Yarn!
It’s an upper body workout without the hassle of travelling to the gym and, instead of sore muscles, you get a beautiful product instead. Endorphins and wool – who could ask for anything more?
There’s no need for any equipment either; all you need is yourself and two balls of our pure Merino wool, which you can find from our store here.
So, get comfy, pull up a chair for your yarn, grab a cup of your favourite tea and join us in the magical process of arm knitting!
There are 4 stages in our how to arm knit guide: Making a Slip Knot, Casting On, Knit Your First Row & Casting Off
Stage 1: Making a Slip Knot

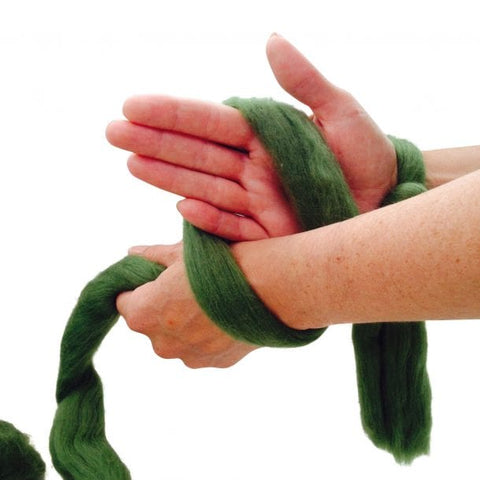
1. Lay your yarn across the palm of your hand and hold it with two fingers. Leave 4 inches hanging below your little finger
Wrap the yarn around your hand

2. Turn your hand so that your palm is facing down
With your other hand slip your fingers under the first loop and grab the second loop that attached to the ball of yarn
Bring the yarn through the loop

3. Slide the yarn off of your hand
You now have created a slip knot
Place the slip knot over your right wrist and pull tight
Stage 2: Casting On

4. Make a loop with the yarn attached to the ball so that the yarn hangs in front of your hand

5. Put your left hand through the loop that sits below your little finger
Grab the working yarn and pull it through the loop
Drop the original loop off your right-hand fingers and place the new loop on your wrist

6. Gently pull the working yarn and tail apart to tighten the stitch on your arm
Repeat until you have cast on the desired number of stitches for your blanket
Stage 3: Knit Your First Row

7. Pick up the yarn attached to the ball and place it over your thumb and hold between your fist
Pull the first stitch from your right-hand wrist over your fist

8. Turn the new loop slightly clockwise so the yarn attached to the ball is closest to you
Place the new stitch on your left wrist and pull gently on the yarn attached to the ball to tighten the loop on your wrist
When you have finished casting on your desired amount of stitches, you will use the same technique to do all of your other rows.
For each cast on stitch allow 2.2 inches. For example, if you want a blanket that is 22” wide, then cast on 10 stitches.
Stage 4: Casting Off
(Only do this stage once you have finished your entire blanket)

9. Knit two stitches
Pick up the first stitch that you knitted and pull it up and over the second stitch
Drop the stitch off completely over your fingers so that you have one stitch remaining
Repeat until you have one stitch left
10. Pull the end of your yarn through the loop and pull to tighten
To neatly hide the strands of yarn left, weave them in and out of each stitch until they are secure
Congratulations! You now have a homemade soft, chunky blanket to add to your woolly collection!

Leave a comment